maandag 17 december 2018

Christmas wrapping

Are you ready with wrapping your Christmas gifts yet? Well I'm not but I have started to figure out how I want to have them look like this year, and I'm gladly sharing this with you.

I've used: * black kraft paper, * a small box (I always save the little ones that come with a delivery), *rope, *dark flower wire, *tape, *scissors *tissue or blotting paper *small branches of rosemary
   
About the boxes I save. It makes it so much more easier AND prettier to wrap those items with a difficult shape, so those boxes usually come in very handy. Furthermore they get to reused this way.


First I put a piece of straight tissue paper in the box on which I put some on it more which I fumbled up so the little bottle from le Labo stays in it's place. You could sprinkle some glitter in it as well if you don't mind the mess when they unwrap it :)


I fold the under layer of tissue paper together and put a sticker on it. You can now even add a card with a handwritten personal message for the receiver to it.


After closing the box and wrapping it in the black kraf paper (I guess you know how that's done) it's time to make the ornament. I've used rosemary this time but of course you can use any kind of green which bends easily. I started to make a small circle with the wire as a base to wrap the rosemary on. You stick the rosemary branch to it by turning some wire around it. Try to keep the little leaves stick out as much as possible.


 The result is a tiny wreath. In this case it also smells delicious (sniffing my hands now)
You can also use it as a napkin ring at your Christmas dinner!


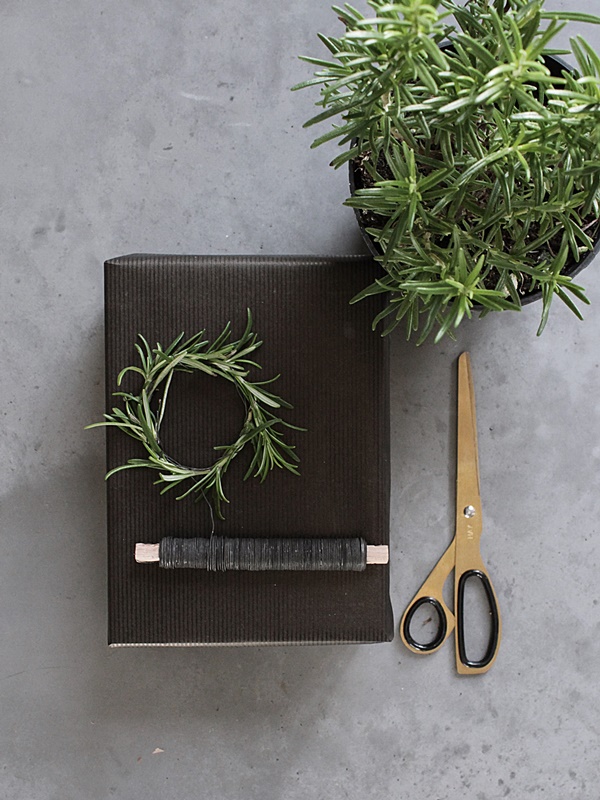
Place the wreath in the centre of the package and secure it with the rope as you can see below. Of course you could also use some pretty ribbon or secure it on 4 sides in stead of 2 like I did.


Simple yet pretty, just the way I like it. Now all you have to do is put it under the tree and wait for Christmas.


Happy wrapping you all!

woensdag 28 november 2018

Zwevende kerstkrans DIY


Zodra de dagen korter worden begint het bij mij te kriebelen en stroomt mijn hoofd vol met ideeën  voor de komende kerstdecoratie. Nu er geen "nogindesintgelovende" kinderen meer in huis zijn kan ik daar (gelukkig) ook al op tijd mee beginnen. 

Het afgelopen weekend maakte ik een kerstkrans om boven de salontafel te hangen. Een simpele en goedkope DIY die ik hier graag met jullie wil delen.


Wat heb je nodig: 


  • ijzeren ring (ik gebruikte er een van 30 cm) die ik kocht bij een hobbyzaak
  • kerstgroen naar keuze, te vinden bij de bloemist of het tuincentrum
  • binddraad
  • schaar
  • snoeitang
  • touw of lint
  • kerstballen (ik gebruikte deze mooierds van Hubsch)


Allereerst knip je wat kleiner takken af van ongeveer dezelfde grote die je met het binddraad vastzet aan de ring. Ik knipte per takje een stukje van het draad af en draaide het om het takje en de ring heen en dan op naar de volgende. Ik koos ervoor om ze losjes naast elkaar te zetten om het luchtig te houden. Wanneer je een wat vollere krans wilt kun je de takken elkaar gedeeltelijk laten overlappen.


Nu heb je de krans als basis. Je kunt hier stoppen (ook best decoratief) maar we gaan verder.


Om hem op te kunnen hangen koos ik voor wit touw, omdat ik een soort van zwevend effect wilde bereiken en mijn wanden wit zijn. Je zou natuurlijk ook voor prachtig lint of draad kunnen kiezen.
Knip 4 stukken in dezelfde lengte af, nadat je de hoogte hebt uitgemeten waar je hem wilt hangen.
De stukken touw knoop je tegenover elkaar aan de ring vast , zodat hij recht blijft hangen.


Hang nu de hanger op de plek waarvoor hij bestemd is. Hoe je hem ophangt is afhankelijk van de plaats en de mogelijkheden ter plekke. Hier ging er een haakje in de balk van het plafond. Draai de takken nu naar de zijkant zodat ze de ring bedekken. Vervolgens hing ik er op gevoel en op willekeurige hoogte de kerstballen in. Een beetje zoals ik bij de kerstboom doe. Af en toe wat afstand nemen om vervolgens één van de ballen weer wat te verhangen totdat ik tevreden ben met het resultaat.

Et voila!

Alsof er een krans met ballen boven mijn tafel zweeft.


Heb je ook zin gekregen om met een kerst DIY aan de slag te gaan? Met nog 17 andere bloggers maken we allemaal onze kerst DIY die we delen op onze blogs, dus er valt volop inspiratie op te doen. Kijk bijvoorbeeld ook eens bij Jenny van @huisgeluk. Zij maakte prachtige kerstballen van kantenband en Kelly van het blog Keeelly91 zit nog te broeden op haar kerstster die zij komende maandag met ons zal delen.

Mocht je met deze DIY aan de slag gaan deel hem dan op Instagram en geef me dan een seintje. Ik ben vreselijk nieuwsgierig naar jullie creaties en laat ze graag op mijn stories voorbij komen. 
Je vind me hier op Instagram


Succes en veel plezier met jullie kerstdecoraties!

zondag 30 september 2018

Garden finds


I love strolling through my garden and every seasons there are little treasures to be found.

Spring (above left) / Summer (above right) / Autumn (down left) / Winter (down right)


Besides all kind of flowers there are also other things to be found


such as fruit


herbs


and even feathers are gathered by me.


I have to admit that one of my favourite is the magnolia. I'm always excited when it starts to bloom.
And besides admiring all this beauty in my garden, I also like to play with it a little ...


Enjoy all the magnificent colours that autumn will bring us!


donderdag 20 september 2018

Online Babyplants


How cool is that, receiving your plants in the mail! And not the adult version, no the tiny ones so you can follow the whole process of growth.

You can order them at online baby plants, they ship all across the European Union, and within a few days they get handed over to you by the mail man or woman. Even in their package they look great, but it's best to release them as soon as possible, it's a bit crowded in there don't you think ;)


You know me by now, I first had to play with them a little. It's such fun seeing some well know plants in miniature, so I had to take some pictures first and styled them in a few different ways as you can see down below. Fresh green all over my place.

top row : Alocasia Zebrina, Pilea, Rhaphidophora Tetrasperma
bottom row : Philodendron Xanadu, Monstera Adansonii, Fittonia Verschaffeltii

(Hopefully I got them all right, if not please correct me)

 in my hand /  notice the zebra like striping on it's stem

two hands-full of joy


After playing (sorry for that) I put them in water (just followed the instructions that where enclosed) so they could get saturated. You only need to do that for about 10 minutes, but I kept them there over night. I needed to get some soil first before I could plant the plugs in a pot :)

(bowls in he middle from Hubsch interior, cups on the outside from Kinto Europe)

And here it is, my plant nursery, gathered all together looking like a tiny urban jungle. For now I planted them using some bowls and cups I had. If they do well (and me of course) and grow just as big as their neighbour standing above them, bigger pots will be needed soon. 


Happy growing yall!


vrijdag 14 september 2018

Totally N U T S


Every year in September nuts are falling in my garden, hazelnuts first, than the walnuts, so you often see me whit a bucket strolling through the borders in search of them. There are always way to many for just our 3-persons family so a few years ago I started handing them out. Not in person though, let me tell you what I do. 


I divide them into small bags. The most fun I have is making the bags look somewhat pretty, so I write something on it ... 

(edition 2014)

dress them up wit a ribbon or something, so it looks like a perfect gift.

(edition 2016)


(edition 2016)

The result always brings a smile on my face. When finished, I put them in front of my house and everyone who wants to can take a bag. All I hope is that it'll bring a little smile on their faces too.


Well it's that time of year again, hazelnut-sharing-preps have started!

I know, I'm totally nuts for making such a fuss about it, but I don't mind a bit. 
After all sharing is caring don't you think.


vrijdag 7 september 2018

Flatlays


I often post flat-lay pictures on my Instagram account, it's so much fun with endless possibilities and it is somehow relaxing to make them. Sometimes I just "throw" some items together and am pleased with the result almost just at ones, but more often you find me sitting on the floor adding, changing, rearranging and strolling through my house and garden for items. 

It all starts by choosing your backdrop. I mostly use a bright one, in this case a white tablecloth, but it can also be the floor, a table top or, very clever, some sticking plastic. You can find it in all sorts of prints, my personal favourite is the white marble. 

After harvesting a great deal of hazelnuts from my garden I thought it would be fun to use them in a not so obvious way and decided to make a hazelnut ice-cream.


I always start with placing the main subject. Rather dull just like this because the colour of the cone and the nuts is very similar so it needs some contrast colour to spice it up don't you agree?


For me green always works, I've got plenty of it around me. I just take my scissors to cut some off in my garden or from one of the plants I have inside.  Oh, and often there is coffee. Don't ask me why, there just is and it is always freshly made. Afterwards I get to drink it as a reward, so maybe that's the reason :)

 I thought this was a bit to much though, and a bit out of  balance, so I removed some again. 
Exit fern! 


And this goes on until I'm totally satisfied, in this case I just had to wrinkle the cloth somewhat to make it look a bit messy which makes it more exciting to look at. 

The final touch is done by editing the picture.


ét voila 

You should try it sometimes.
Let me know when you do, I would love to share some on my Instagram stories.

donderdag 30 augustus 2018

Scandinavisch Design


Diegene die me al een tijdje volgen, hier of op Instagram, kennen inmiddels mijn voorliefde voor het Scandinavisch interieur. De afgelopen jaren is het Scandinavisch wonen (Nordic Living) steeds meer mijn huis ingeslopen gecombineerd met een “touch of me”. 
Ik hou van het gebruik van natuurlijke materialen, zoals hout en inmiddels ook een betonnen vloer, en het minimalisme in inrichting en kleurgebruik wat bij mij zorgt voor rust. Er worden vooral lichte kleuren gebruikt. Begrijpelijk als je bedenkt dat de winters in Scandinavië lang en donker zijn.

Scandinavisch design is een design-beweging gekenmerkt door eenvoud, minimalisme en functionaliteit die is ontstaan in het begin van de 20e eeuw en die opbloeide in de jaren 50 in de vijf Scandinavische landen Denemarken, Zweden, Noorwegen, Finland en IJsland. Een aantal grote designers zijn Arne Jacobsen (Egg Chair)Verner Panton (Panton Chair)Hans Wegner (Wishbone Chair) en Poul Henningsen (PH lamp). Ontwerpen die tot op de dag van vandaag in de belangstelling staan. Alhoewel er verschillen zijn is de eenvoud en de functionaliteit altijd duidelijk aanwezig en wellicht juist daarom tijdloos. 

De laatste jaren staat het "Scandiliving" ook hier in Nederland en België volop in de belangstelling en er vindt een ware revival plaats van de oude ontwerpen die wederom worden geproduceerd, maar er zijn ook volop succesvolle "nieuwe"merken die de wereld veroveren met hun designs. Veelal wordt de samenwerking gezocht met designers en of designstudio's en dat doen ze zeer succesvol. Niet gek dus dat ook hier de bekende interieurdesignwinkels een ruim aanbod laten zien van een groot aantal Scandinavische merken, zoals bijvoorbeeld bij Flinders die zowel in Nederland als in België online te vinden zijn. Ik moet bekennen dat ik heel wat tijd op hun site heb zitten rondstruinen en mijn wishlist is inmiddels veel te lang. 

Laat ik dus hiervoor eens een paar van mijn favoriete, hedendaagse, Deense merken en producten in de schijnwerpers zetten.


M E N U 

Zelf zeggen ze:We want to make the world better, less complicated, a little bit nicer to wake up to. Collaborating with super-talented designers, we make objects to be treasured now and forever”  en wat mij betreft lukt ze dat aardig, kijk zelf maar. Ik koos een aantal van mijn favorieten uit die stuk voor stuk niet zouden misstaan in mijn huis.


Boven:Plint Low salontafel ontworpen door Norm Architects
links onder: Afteroomchair ontworpen door Afteroom
rechts onder: Leonard Hanglamp ontworpen door Soren Rose Studio
(fotocredits: Menu)


F E R M  L I V I N G

Het begon ooit allemaal met behang, maar inmiddels hebben ze een totaal woonassortiment, teveel om op te noemen. Persoonlijk ben ik groot fan van de multifunctionele plant-box, heb er zelf dan ook twee. De ene in de badkamer (vol met toiletspullen) en de ander in de keuken (vol met olie, kruiden e.d.), maar natuurlijk is hij ook geweldig te gebruiken voor planten 😊  

Hun uitgangspunt is als volgt: “we challenge ourselves to shape the future and take pride in creating products that help you balance the contrasts of life”  onder andere zien in de volgende producten.


Boven: Ferm Living Ripple long drink glazen
links onder: Ferm Living Wire Basket met deksel
rechts onder: Ferm Living Plant Box
(fotocredits: Ferm Living)


Hay werd opgericht in 2002. Ik speel al een aantal jaren op mijn instagram flatlays met hun scharen zoals je onder andere hier kunt zien (de twee linker), maar ze hebben nog zoveel meer moois!

“ We strive to make a good design accessible to the largest possible audience”  en daar zijn ze in die korte tijd aardig in geslaagd. Op onderstaande foto’s zie je een aantal van hun producten. Ik ben er van overtuigd dat je deze vast al eens eerder bent tegengekomen, het origineel of een afgeleide ervan. En let ook eens op de namen die ze aan hun producten geven, ik hou van dat soort creatief denken.


Boven: Hay Strap Spiegel
links onder: (Don't Leave Me) DLM bijzettafel ontworpen door Thomas Bentzen
rechts onder: (About A Chair) AAC stoel ontworpen door Hee Welling
(fotocredits: Hay)


simpel kan zo mooi zijn 


(This post is made in collaboration with Flinders)

donderdag 9 augustus 2018

Restyling


Old and new furniture has entered the rooms again. That's the fun part, decorating, styling and seeing how it all comes together.


There's a new (bigger) dining table with the same old Tolix chairs and lamps. 
A small change but it brought a whole new feel to the dining room. 


The same couch and the lamp has switched from the left to the right. Having problems to decide witch colors of cushions I want to use on my couch. Me and colors, a tough combination :)
The previous coffee table got a different destination so a new one is high on my wish list. Still haven't found the perfect one so for now this has to do.
 

To the right you see what destination the coffee table got. We stacked them together to what it originally was meant for, a rack. I guess the content in it will change regularly.


For now it is dressed up like this.


The fire place isn't quit finished yet. Some small adjustments need to take place, but I'm happy how it came out so far. It's hard sometimes to imagine how the final result will look like for real. I had an idea in my head, but my men and the painter weren't convinced at first if it would work. Well it does!


And this corner is still a bit empty. It is waiting for a costume made cupboard. But first things first, it'll come in due time.

In in all of this the new concrete floor is the hero. We should have done this ages ago.